Have you ever had to set up a bastion host (aka jump box)? Maybe to make your internal servers available, perhaps for a break glass out-of-band scenario, or to make your lab in a private network available to the rest of the team.
In this article, we’ll look at how to do this in just one minute. Best of all, your users will be able to log in using just their existing single sign-on credentials, so there is no need to ship SSH keys around, and you, as the administrator, get lots of security, control, and visibility.
Tl;dr .. Don't like reading blog articles... just watch the video demo!
What do we want out of a Bastion server
A bastion host typically serves a few needs; depending on your scenario, all or a handful of these will likely apply.
Network access: First of all, a bastion host, sometimes referred to as a jump box, serves as a way into your network or cloud. Typically you first SSH to this server, and from there, you can access other resources that aren’t directly connected or available from the Internet. You can now do your database queries, ssh to other machines, or, using port forwarding can, visit internal apps. As a result, it’s common for these bastion hosts to have “two legs“, one leg on the public Internet and one with access to your private network.
Security: Since your bastion host provides access to your internal network, the Bastion host should be secure. And because it’s typically accessible from the Internet, you’ll need to take extra care. Running an SSH server directly exposed to the Internet comes at a risk. So if possible, firewall it, ensure packages are up to date, etc.
Notifications: Given users' elevated access once they're on the Bastion server, you may want to get a heads-up when someone logs in. I've seen environments where Bastion hosts were only spun up in case out-of-band access was needed. Because of the potential risk and elevated access, these boxes provide, many alerts would go off when a bastion host was spun up. Note: None of the above would be an issue if the Bastion host wasn't directly connected to the Internet (we'll get back to that in a bit).
You need some form of user management to log in to your Bastion host. Typically, this means ensuring the right SSH keys are on the system for a shared user account on the bastion server.
Last but not least, ideally, we have some audit logs that tell us precisely who logged in when, from where, and bonus points for the ability to record the session.
How hard can it be right?! It started out easy. Spin up an SSH box, dual home it, and copy some keys from your teammates. Done! A few weeks later, you realize that box needs regular updates, especially since it is accessible from the Internet. A team member has left the team, and you forgot to remove their SSH key. Someone logged in on a Saturday night as user ubuntu, and you wonder who in your team that was? Unfortunately, that’s hard to tell since it’s a shared user. You also don’t know what this user did since you have little to no session logging.
So although things started out easy, running a secure and compliant bastion service turned out to be more challenging than expected.
A better and easier way using Border0
Good news, there’s a better and easier way to build your SSH bastion host. Using the Border0 SSH services, you can still provide all the requirements we went over earlier and solve the challenges we outlined. Best of all, it can be deployed in under a minute and is cloud managed.
Let’s first look at a demo; I started the blog with a bold statement, saying it would only take one minute to get going with Border0 and add it to your Bastion host. Let’s take a look what it takes.
We assume you already have an SSH server you want to use as a bastion host and have a Border0 account. If you don’t have an account yet, just follow this link it will take you 30 secs to sign up for free.
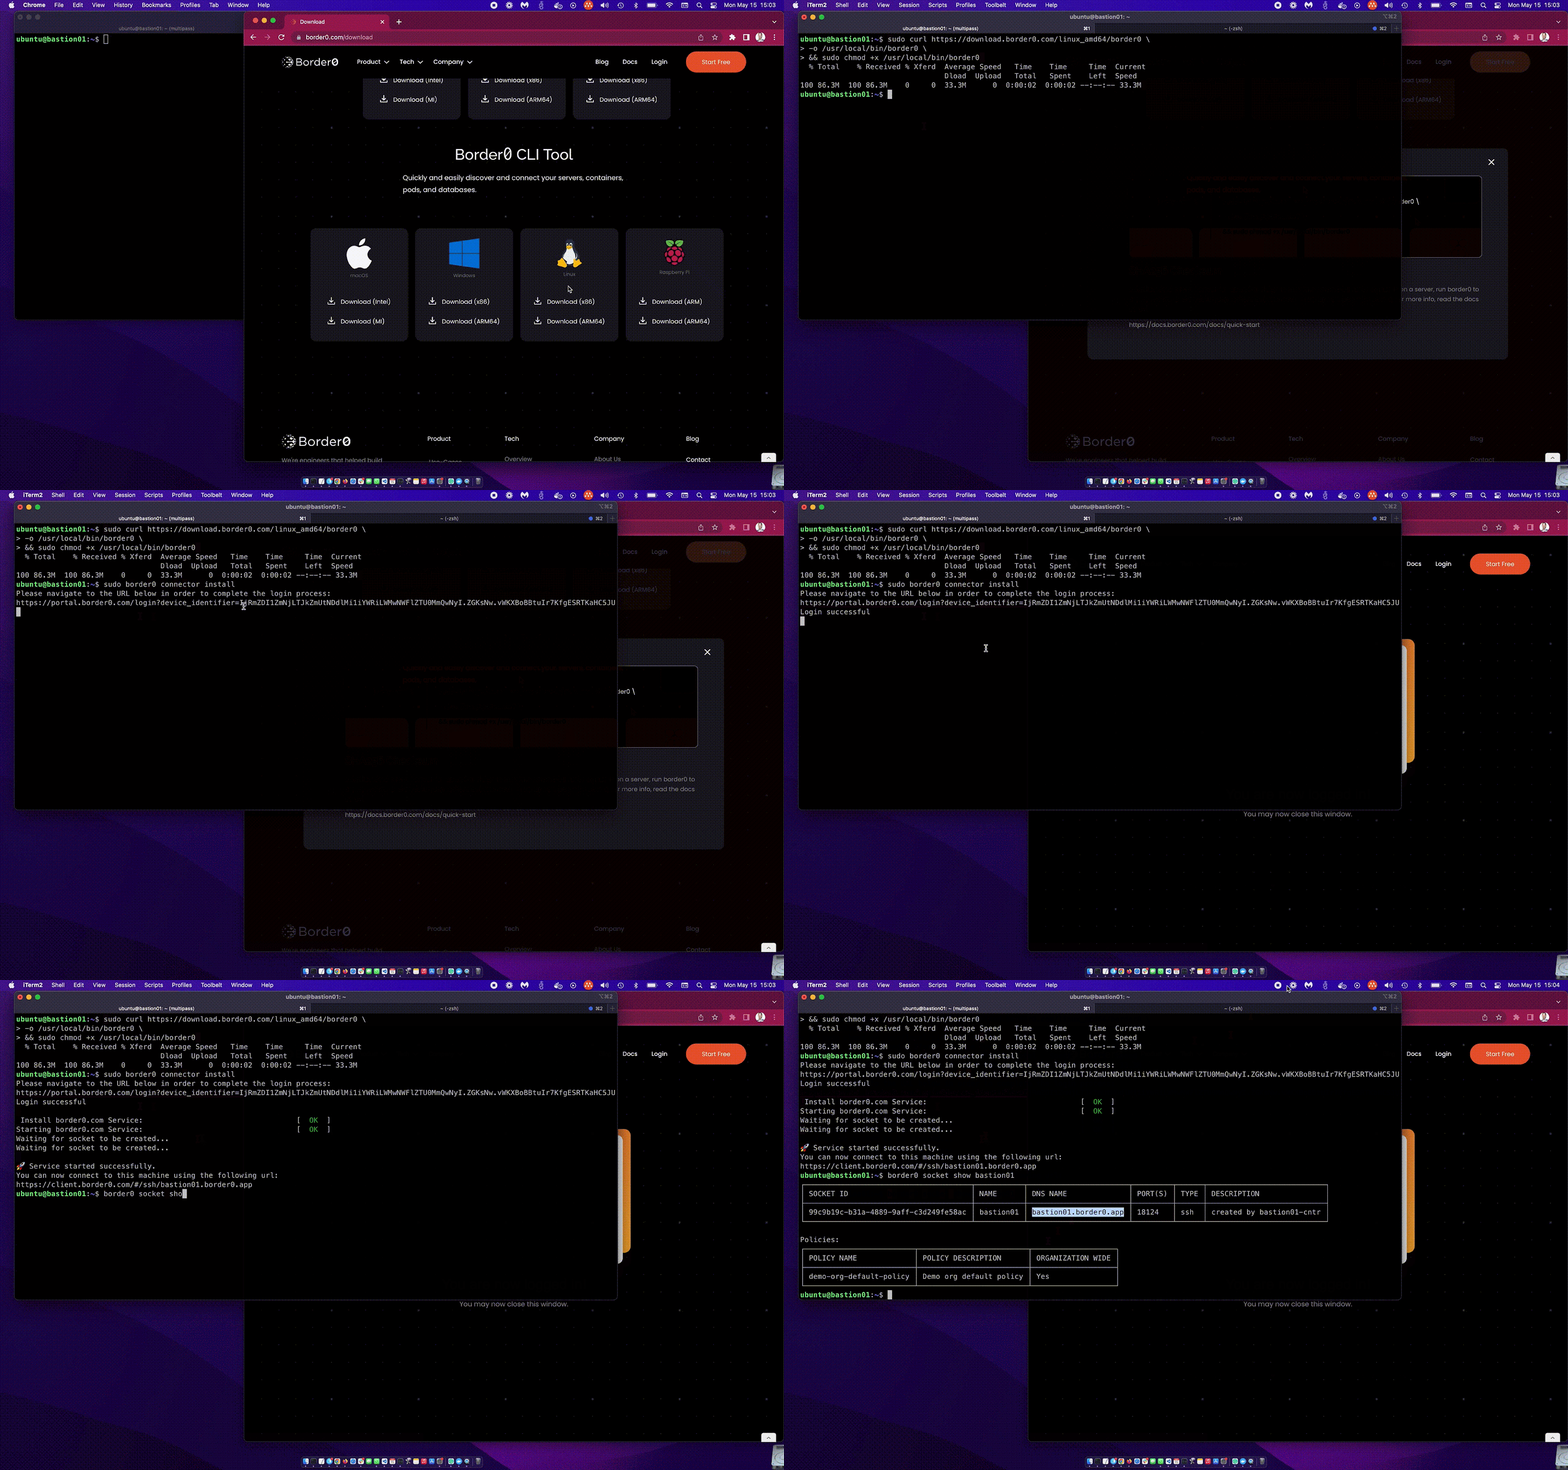
First, we need to install the border0 binary; that’s as simple as downloading the correct binary from our download page and installing it:
Now install the service:

The video above demonstrates the border0 connector install process. A lots happening in just a few a seconds: first it will install the systemd unit for you, ask you to log in, create and fetch a connector token just for this host, create the SSH service (socket) in our system, create a local config file and start the service with the built-in SSH server, start the tunnel and… Done! That was easy! 🤓
Using your Bastion host
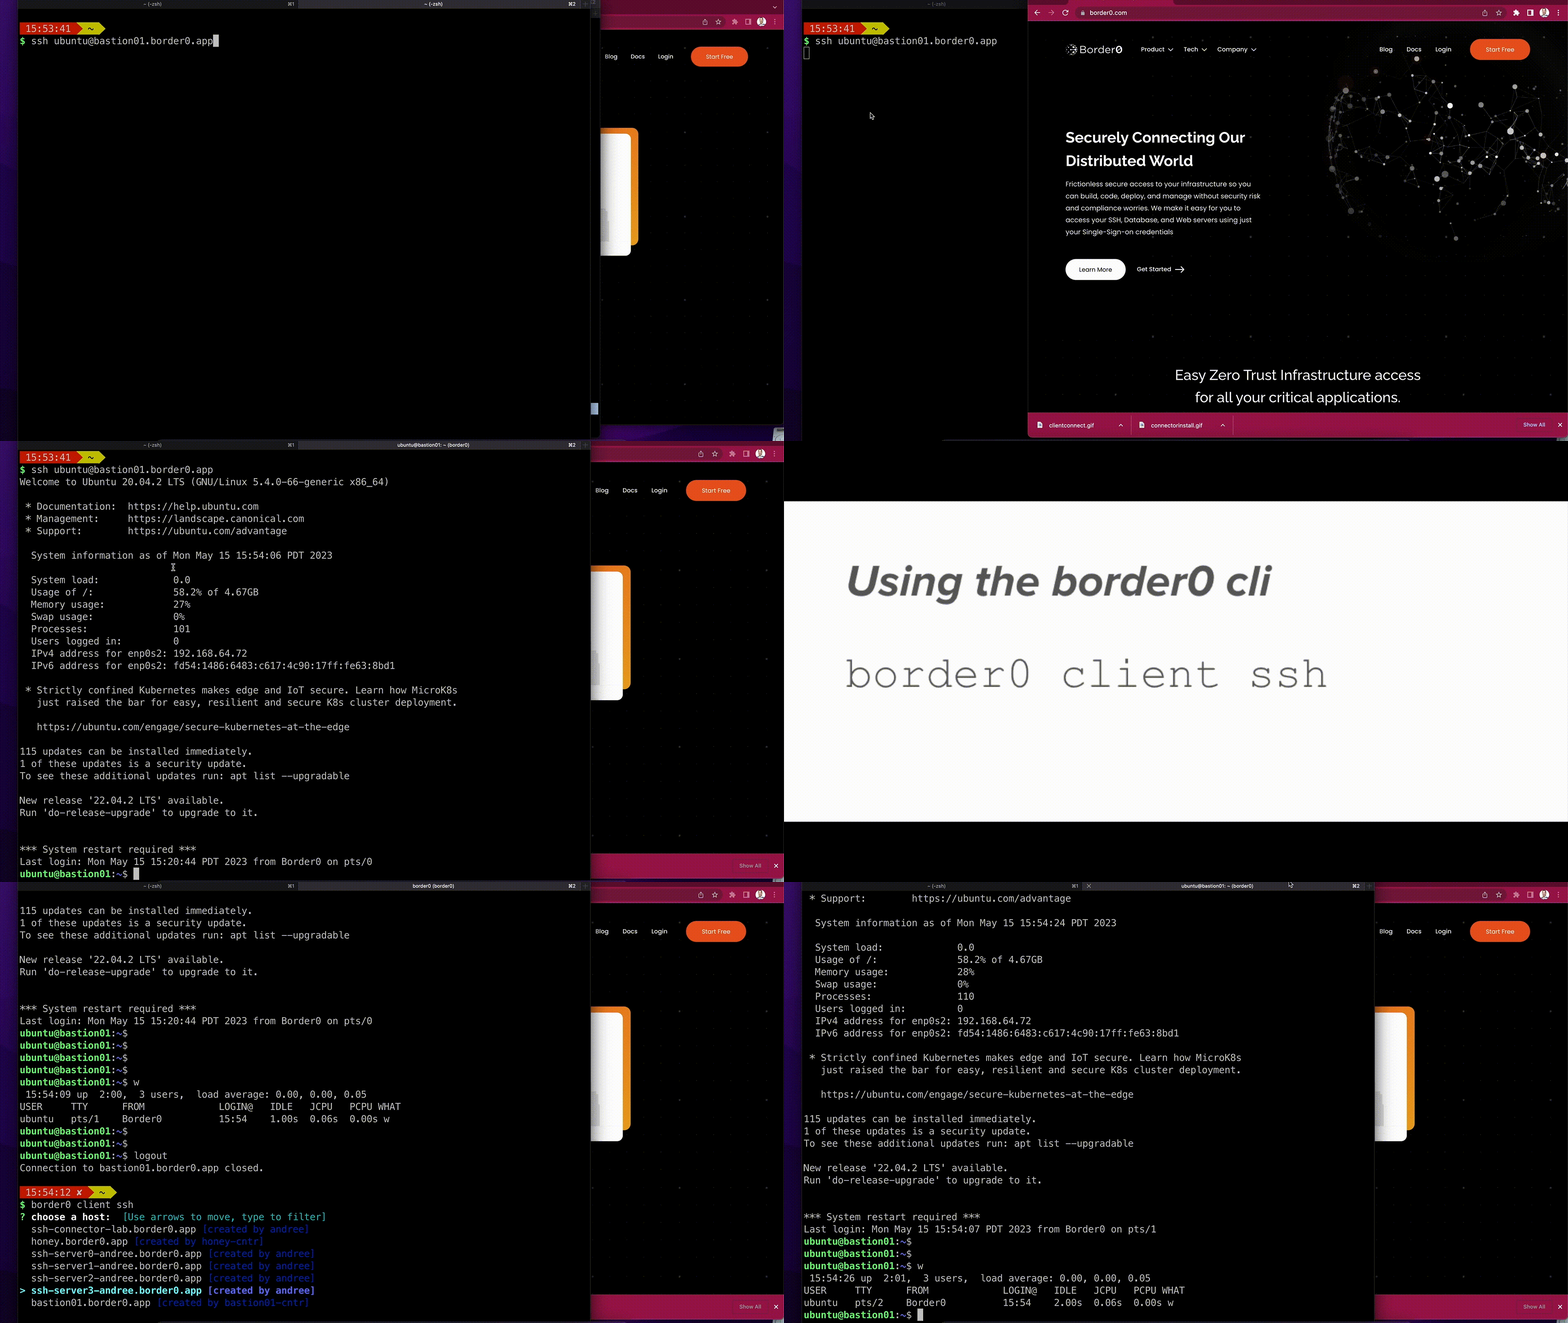
To access your new bastion host, you can either use one of the Border0 provided client tools or your regular SSH client. In the example below, we’ll demonstrate both. For both scenarios the border0 cli tool needs to be present.
First, we use the regular OpenSSH client to demonstrate that we integrate with existing workflows and that engineers can keep using the tools they know and love. The second SSH session is started with the command: border0 client ssh and will show the user all SSH servers they have access to and can then select which server they want to connect to.

Notice that the first time the user connected, they were asked to authenticate with their Single Sign-on credentials. In this case, the user could use their Google or GitHub account. However, we also support administrators to bring their own Identity providers, such as Google workspace, Okta, or any generic OpenID connect or SAML provider.
Solving the Security, Visibility, control, and auth challenges.
Now that you’ve seen how we provide access to the SSH bastion server using Border0, the solution to some of the challenges outlined earlier may already be clear. Let’s quickly revisit them.
The first big win is that your Bastion host doesn’t need to be directly accessible from the Internet. This is possible because the Border0 connector creates a secure outbound tunnel connection to our Anycast cloud. This allows you to run your SSH bastion host without the need for a public IP. That means you can run your server behind NAT or a strict firewall, like, for example, a private VPC. The Border0 SSH server is only accessible on this secure tunnel. Ie. No more port 22 exposed on the network at all! Less exposure is better.
Next up, we no longer have the problem of key rotation. From now on, your users can log in using just their existing Single Sign-On credentials. This means that when new team members join, they can immediately discover and access all the servers they have access to (as defined by your policy). No more need to ask about public keys and shipping them around (and rotating them!). This also means that when a team member leaves and their SSO account is removed, they won’t be able to log in to your bastion host any longer. Yay for the Infra team, one less on-boarding & off-boarding ticket for the team!
Increased Visibility and control.

Using border0, you’ll be able to quickly answer who (SSO identity) logged in to your servers, even if we use a shared Linux account. We can also promptly report from where and when these sessions happened and for how long. Best of all, using our SSH session recording and replay capabilities, you can see exactly what happened during these sessions.
If you really want to impress your team, you can also easily hook up one of our built-in notification features and get a Slack message, email, webhook, or even a pagerduty notification each time someone logs in🚀. You’ve got your Visibility and alerting covered!
Controlling who should have access to your bastion host and under what conditions is easy too. The border0 policy language allows you to specify exactly who (SSO identity) should have access to what servers and under what conditions. Things you can include in your policy are a list of SSO identities (email addresses), time of day, date ranges, IP addresses, and Country codes. Giving you fine grained control at a level that goes way beyond what a traditional firewall or security group can provide.
Wrap up
In this blog post, we looked at how to make an SSH Bastion server available using Border0. We saw how it’s not only super easy but also provides various security, control, and visibility improvements out of the box, with just one minute of work.
Your security team will appreciate the extra visibility and control, which will help with the various compliance challenges. And because there’s nothing that needs to listen on port 22, you’ve reduced the attack surface significantly; those pesky SSH scanners won’t find you!
Your engineers will appreciate the easy access with just their SSO credentials, no more VPNs, and they can continue to use their existing tools. Finally, everyone involved will appreciate that we can stop responding to the endless tickets to add or remove users and keys. It just works!
So whether you’re using an SSH bastion node to make your home network behind NAT available or need a highly available and secure bastion service for your production network, Border0 is here to help you! No more public SSH servers, No more key management, and lots of extra visibility and control. Finally, no additional infrastructure for you to deploy or manage!
Alright, that was pretty simple, right? Curious and want to give it a spin yourself? Try out our fully featured free community edition, or schedule a demo and let us walk you through a custom demo, Let’s geek out together 🤓
Ready to level up
your security?


.png)


